Construction of Hydraulicus

The final stages

Glue the lip of the syringe that protrudes from the bottom and tape the split pin to the stand
Step 1 Glue the lip of the syringe that sticks out from the bottom using the hot glue gun. Tape down the split pin "B"
Step 2 The syringe at the base will generate enough force to push the plunger out but may not generate the smae force in pulling it back in. An elastic band is attached to help pull the plunger back. Loop an elastic band(supplied) around the tube of the syringe attached to the turning mechanism (as shown on the right)
Inserting the elastic band.
The complete assembly. Click to see how it works Step 3 Stretch it over the end of the plunger as shown in the picture on the left.

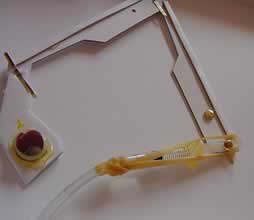
Step 4 Attach the tubes to each syringe controlling the neck and jaw as shown on the right. First pass the nozzle through the screw eye and then attach the tube.

At the other end of each of the three tubes a 10ccm syringe is attached.

Attaching the tubes. Click to see how this syringe works
Continue

Home


Tape down the split pin. Glue the lip of the syringe.